Starting out with Ashes of Phoenix
- Installation
- Configuration
- Modding
- Registration / Character Creation
Choosing a Faction- Faction Layouts
- Leveling up your Character
- Getting Basic Gear
- Starting out with PvE
- Starting out with PvP
Installation (1-2 GB)
Season 6 Changelogs
In oder to install the Client you can Download it from this Link. Season 6 Client
The Client is ready to launch, and needs no "Installation" in the sense of actually starting an installer.
You can treat it as a portable folder, as the folder is anything you will need to start the game.
While the game runs perfectly fine on an HDD - due to its small size, it is advised to save it onto the SSD if possible, as that will ensure you will have low times loading into a new map when crossing the grid.
Configuration
Before starting the game, it is advised to configure some things.
There are 3 things to configure.
- Basic Configs in the FOConfig.exe
- Advanced Configs in the settings.ini
- Hotkeys in the hotkeys.ini
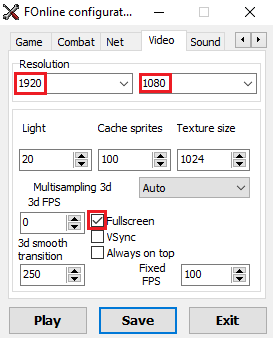
Open up FOConfig.exe in the Root-Folder of your FOnline installation.
- Resolution, Sound & Always Run!
Advanced Configs in the settings.ini
Hotkeys in the hotkeys.ini
I can not tell you to change something here, as hotkeys are complete user-preferences. However, I will recomment keybinds that a lot of players use due to intercopability with other FOnline Servers. (Mainly FO2).
I do personally think they are better then the default keybinds as well.
TODO: Hotkeys
Modding
While Modding is also a more advanced topic, having some Quality of Life mods can greatly improve your new-player experience (And can give you an advantage in-game).
A lot of these mode do break the charm of the graphics, as they completely replace them with simple hectagons and make the game look uglier. Posting a screenshot with said mods can also make some people despise you.
However, you should not be intimidated from some people who look down upon mods, as a lot of them do make the gameplay more comfortable and less head-achey.
TODO: Add Mod Links and Installation explanation.
- No Walls
- Smoke / Fire
- Highlighter
Character Creation
Don't overthink your character creation. Rerolls are currently free and happen instantanious, without having to "Recreate" your character as in other FOnlines. (You never log out of your character when rerolling. You can also reroll in the Zone though you will have 1 HP and all your gear unequipped when doing so. So watch out!).
This also means you generally do not need more then 1 character. As Skills that Level-Up by using them also stay at their Levels upon a Reroll.
Reroll often! This will make sure you get to try out different Perks, Traits and Skills and will help you form your own opinion of certain perks, traits, or their combinations. Since everyone has their own view of certain Perks etc., forming your own view and your own calculations is very important.
Rerolls are not free anymore. Only your first Reroll is free and you get more Buildslots as you level-up. Thus it is recommended to go with the Starter Build unless you are given something else or know your way around already.
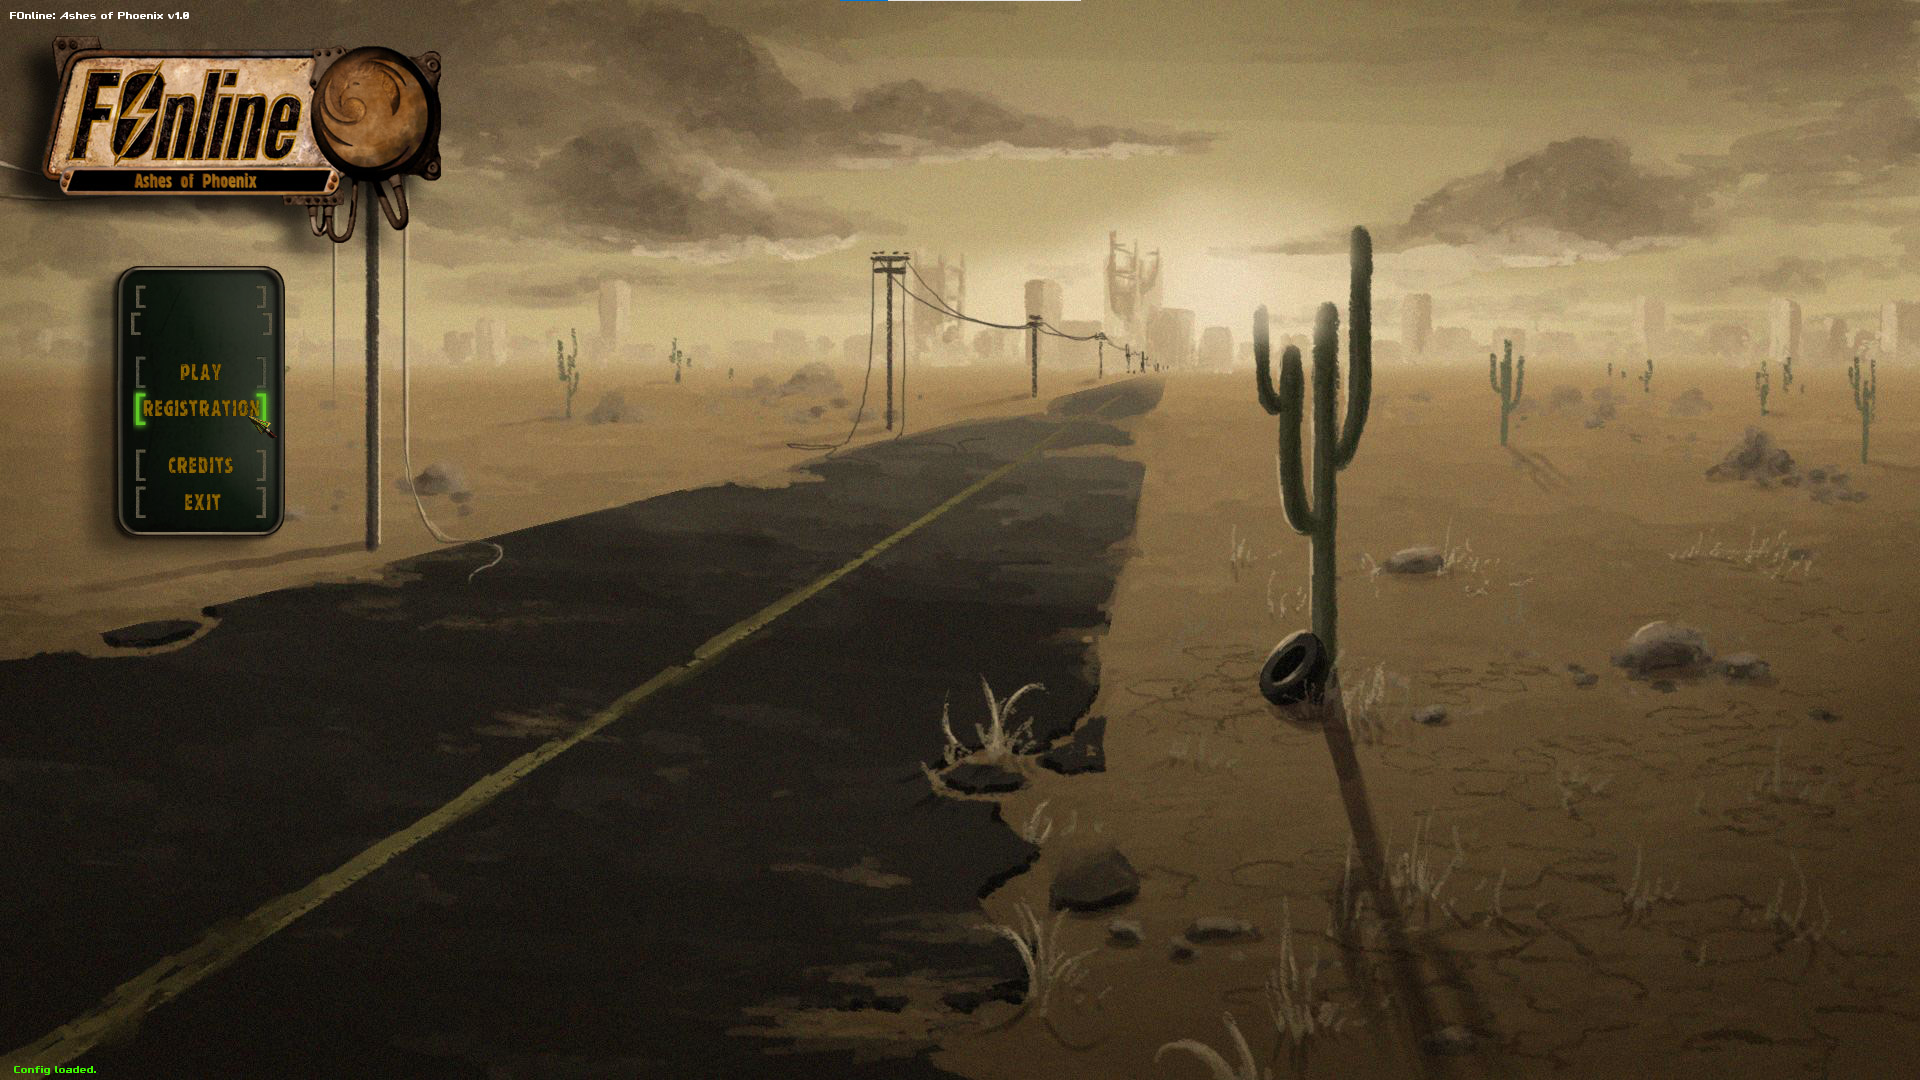
On the Top Left, by clicking on the bar, you put in your name and password. As everywhere, use a unique password and don't share it!
You can change your gender, as well as your age. However, your age has no game-play change at all, and only changes your description text. (The female character is generally considered superior due to a smaller click-to-select-box. Though when playing a tanky character you could use a Male character to cover your teammates Model better)
Next are your Special-Stats. If you have no particular Build and are a complete Newbie, I will from this point on forward suggest a more or less universal build that is neither bad nor good at anything.
While I personally think the Sniper class is a good newbie build, since if following a good leader you shouldn't have a lot of problems surviving and doing your job, it is not universal, so instead it will be a barebone template which can burst with small guns or big guns weapons, throw grenades, heal and use some heavier guns.
I also tried to not use perks you could get too dependant on when starting out the game. Perks like Simian Warfare or Living Anatomy can get you into bad habits or a false sense of information-gathering you don't have without these perks.
The Build in the Online Planner
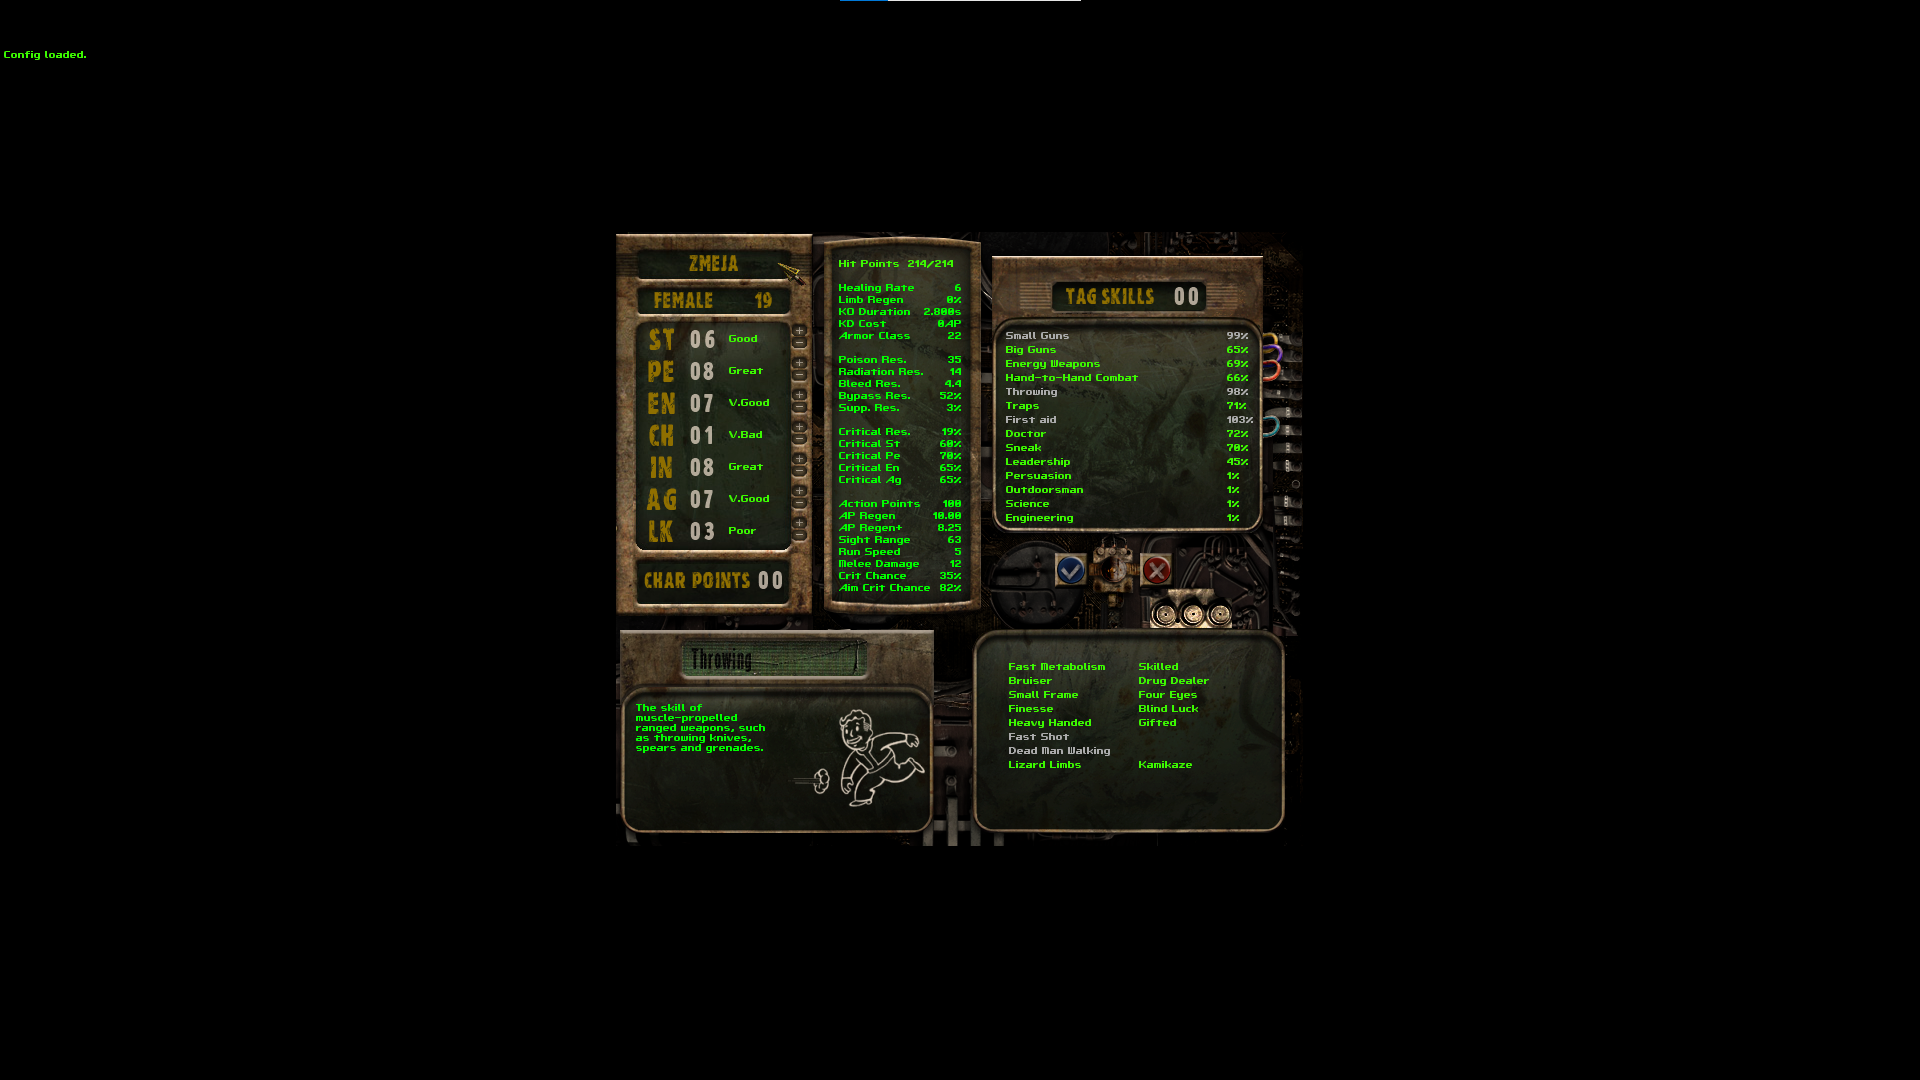
SPECIAL
ST - 6 (You will be able to use most weapons without a malus and have somewhat decent Carry-Weight for Looting)
PE - 8 (Going under 5 gives you great Mali. And in order to see a bit more, especially at night, we are going for 8)
EN - 7 (Provides us with a good chunk of HP and Critical Endurance, basically all the left-over points were dumped here)
CH - 1 (At first, especially when playing Solo, you will have 0 use out of Charisma other then the Suppression Resistance. 1.)
IN - 8 (Allows us to have enough Points for Maxing out our Weapons Skill, and both First Aid and Doctor over 150.)
AG - 7 (Provides us with a good chunk of AP+ Regeneration and Critical Agility, the other half of the left-over points were dumped here.)
LK - 3 (Provides us with a bit of Critical Resistance, together with the Perk Man of Steel this will at least give us some basic Protection against Crits)
Traits
Traits are a bit more complicated in that they not only give positive things, but quite often nasty negative things as well. So it might be viable to choose no trait at all in some cases.
- Dead Man Walking (An absolute Lifesaver of a perk. You lose 10 Maximum HP but you get 100 more Bleed Out HP, meaning that if playing in a Team you get to die less, waste more of the Enemies AP, and get revived easier.)
- Fast Shot (While not necessarry a perfect perk, since its drawback is quite noticeable especially for Snipers. It allows you to shoot more often and get used to the guns quicker because of that. If playing the Heavy class, its drawbacks are entirely voided, making this a very good trait.)
Perks
Perks were probably the hardest to pick. Since most Perks are viable and good, and everyone has their own preference, I still tried my best to go a neutral, balanced way of choosing them.
They are sorted from "Very adviseable" to "Feel free to remove and pick something else".
- Improved Hemostasis (Especially as a new player, the Bleed Mechanic might be overwhelming, with this Perk making you worry lessa bout it. I understand I said I don't want to introduce bad habits, but I think the bleed mechanic might be a bit too much for newer players)
- Faith Healer (Makes the constant use of First Aid a little bit more unforgiving. Just as the first perk, make sure you don't get into the bad habit of using First Aid *too* often. You want to use bandages to remove bleed and stimpaks of any sorts to heal yourself to mitigate the Bandage Level.)
- Hawk Eyes (More View-Range. Especially at night where you have less Sight Range, this Perk will help a lot. While not giving its full bonus at night, it will still give you around ~5 Hexes (instead of 8))
- Man of Steel (More Critical Resistance.)
- Dr. Strangelove (Flat 50 more heal for First Aid if you have no bandaged level yet. Also side-effect of having 5% more Explosive Resistance.)
- Quick Recovery (Can get you out of sticky situations quicker, by giving you less duration of various debuffs you get.)
- Lifegiver (More HP.)
- Bonus Rate of Fire (Exchange for Fast Reload if your weapon has high Reload cost and relatively small shoot-cost)
Skills
You can Tag 1 Primary Skill. And 2 Secondary Skills.
- Small Guns or Big Guns (250) (The type of gun of your choice. I do not advise taking Energy Weapons or Close Combat for a newer character)
- First Aid (159) (More HP healing yourself)
- Throwing (160) (Be able to throw Smokes and other grenades with up to 3 Weapon Perks on it and kinda decent Range)
The reason we don't pick Doctor instead of Throwing is that up to 150 First Aid, you automatically get a Bleedover to your Doctor Skill, which is 150 as well. After 150 First Aid, you get less and less additional Doctor (Visible in the Planner under the "Medic Bleedover" Stat. (With 200 First Aid you have 175 Doctor)
This will not unlock Doctor Perks on Items using that Skill, but you won't use those items anyway.
After Level 24, the 3 tagged Skills will be LOCKED. Meaning you can only increase all the untagged Skills. (This also means that if you are rerolling, make sure to increase your Skills first, and then take Perks)
(The other Primary Skills up to your highest Primary Skill (Since you have 250 you can max every other Gun Skill).
(The other Secondary Skills up to your second highest Secondary Skill (Since you have 160 Throwing and 159 First Aid you can increase the Rest up to 159).
Prioritate on getting Doctor up to 159 after Level 24. And afterwards a second Gun Skill to 250.
You have created your character! Congratulations! Now it's time to Log In and proceed with your In-Game Tutorial-Area!
First of all, as soon as you Log-In. Make sure your Settings are working and your Mods are loaded.
Afterwards, Press Ctrl+F and see if your Computer can handle the Rendering of the FoV Area of your character. If so, I advise you to leave it on.
Press Q until you see a Green Line, though technically not necessarry since you have the FoV Area, it can still help you figuring out your Max range when in buildings etc.
Press W until you see a Red Line, (After pickint up a gun, press W until you see a Red AND a White line. Where Red is the maximum Range of the Gun and White your current effective Range (95% Hit Chance)).
Test your Keybinds and then proceed with the Tutorial.
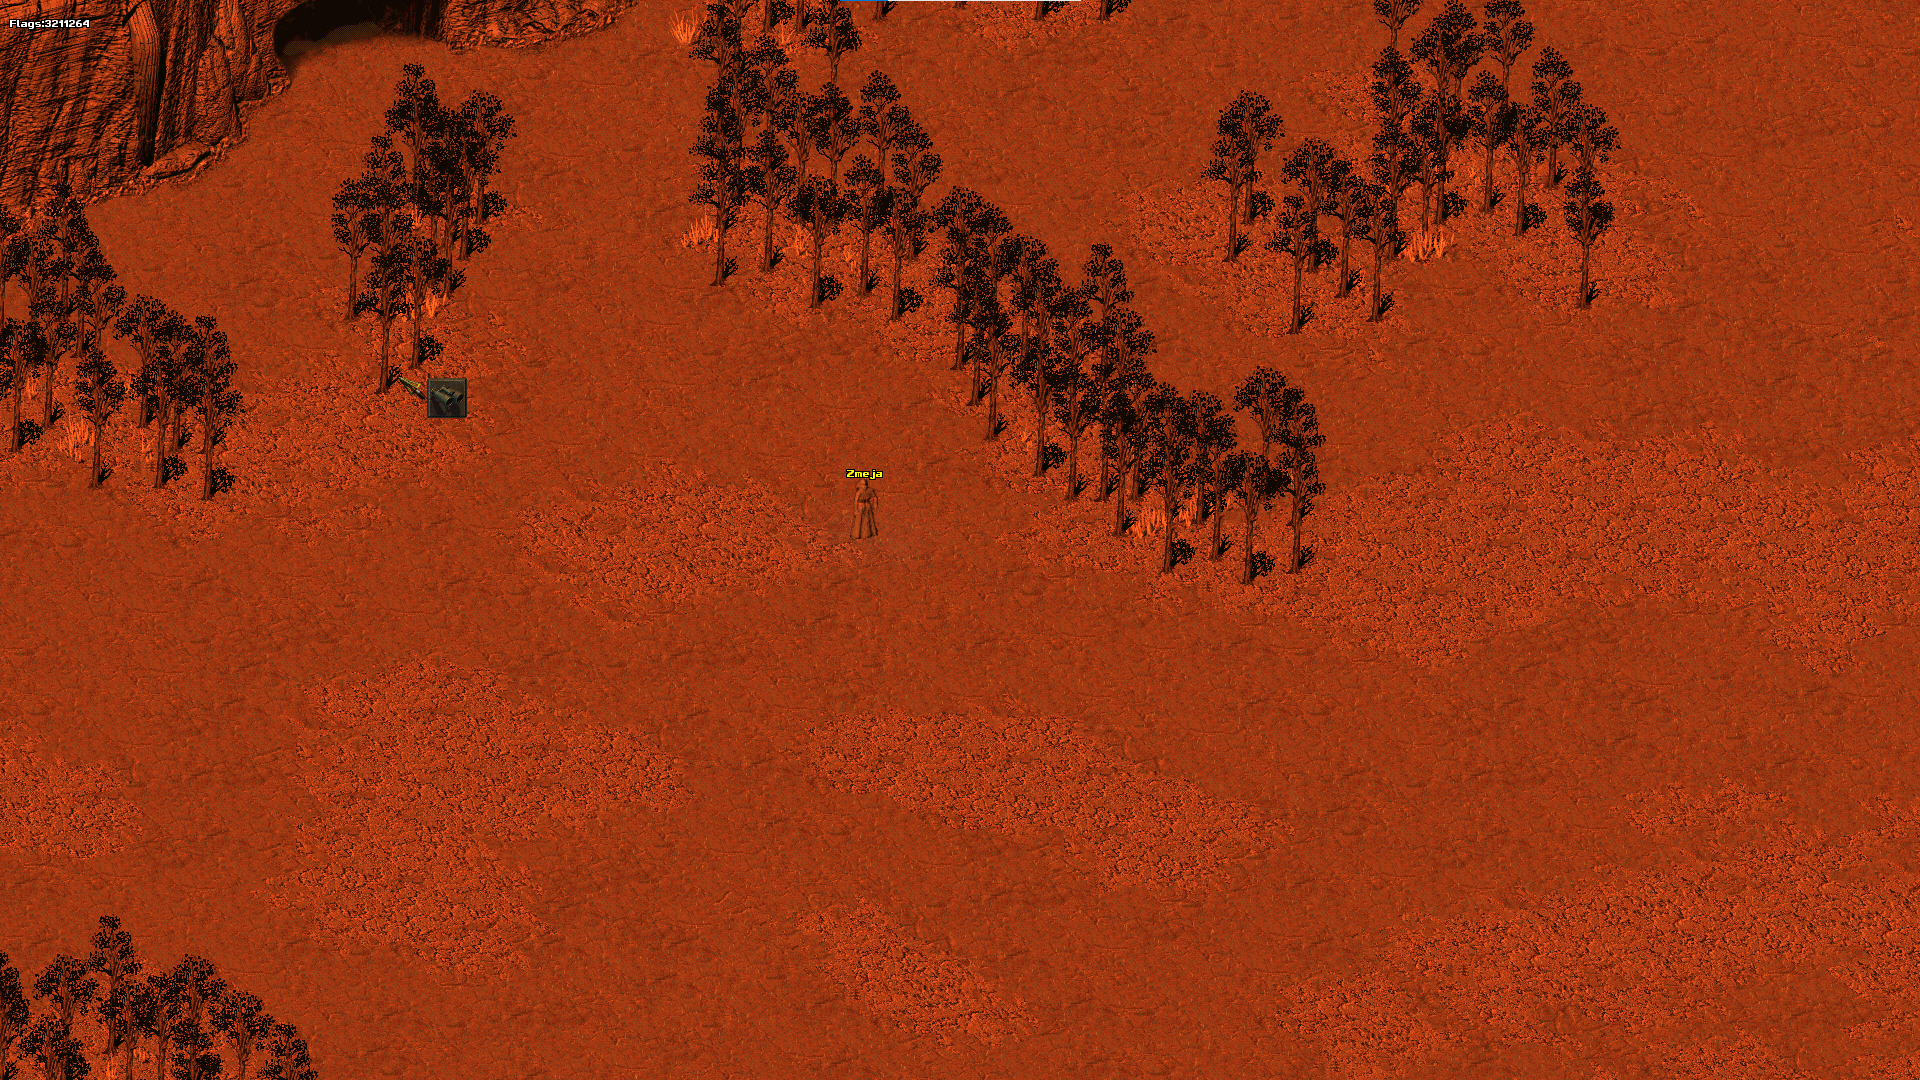
After spawning into the World, you will see yourself in the middle of a Sandstorm, with a safe cave on the top left. You move around by right-clicking - move towards the entrance of the cave and you should automatically enter a new area.

After having entered the Cave, you want to loot the body to your right. Just left-click the body with your mouse, your character should automatically move and loot it. If for some reason you are in Attack-Mode (Visible by a red crosshair), use Space to switch in-between modes.
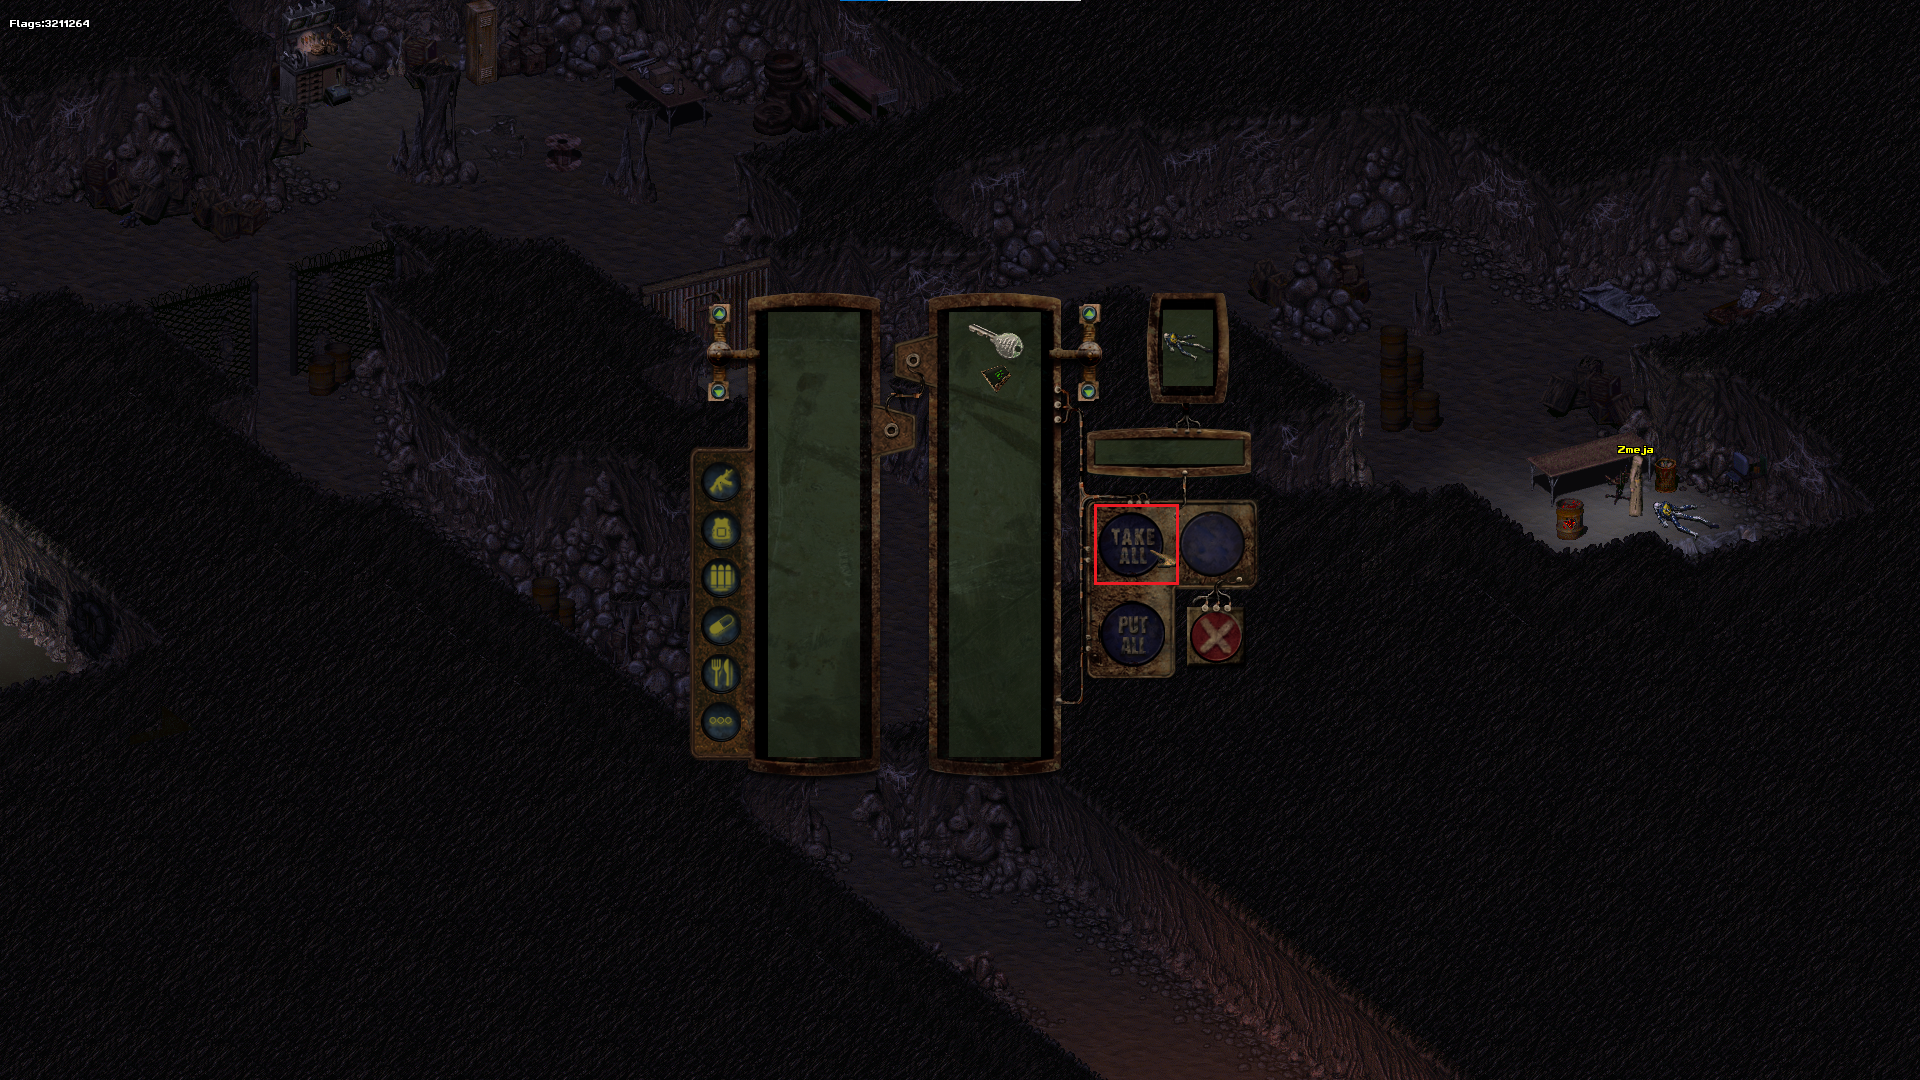
When looting the body, a Screen pops up. On the left is your inventory. On the right is the inventory of the body. Just press "Take All" to take all items. Optionally, you can drag them both into your inventory to the left.
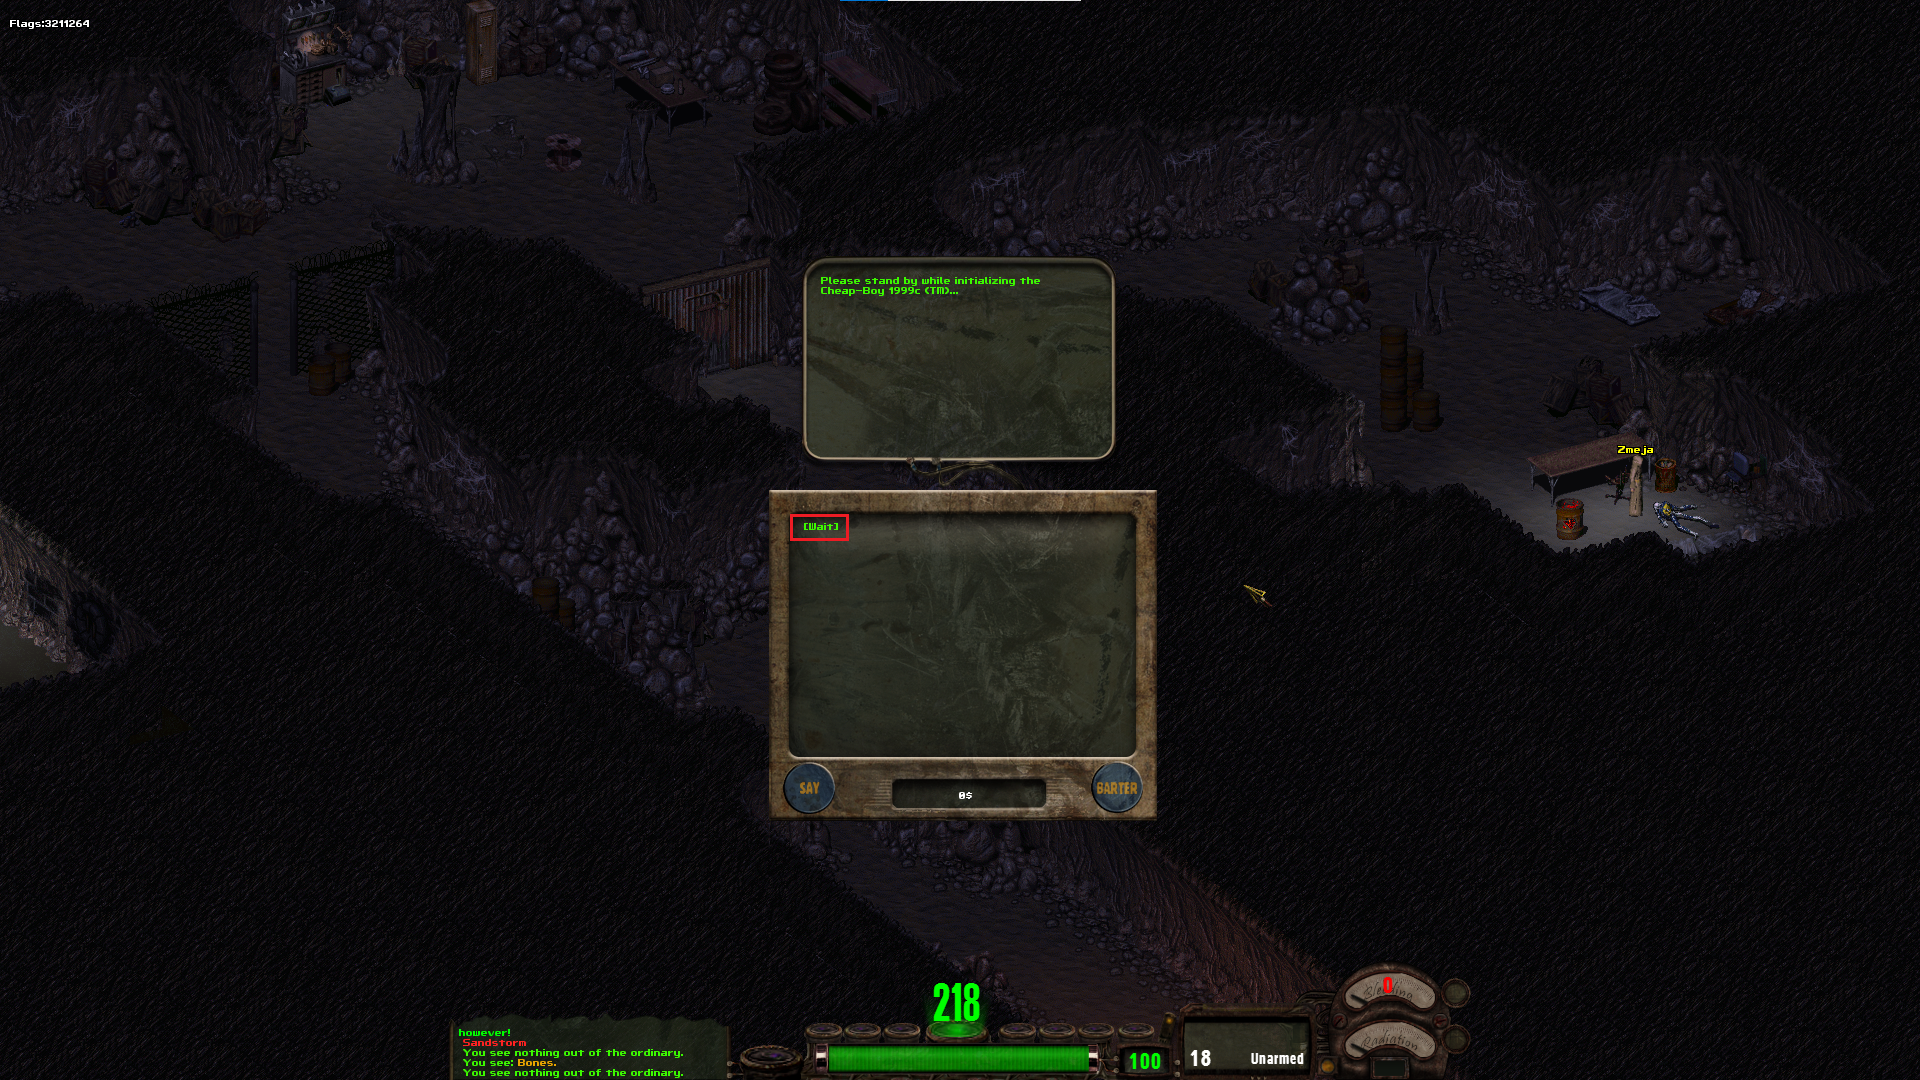
After looting the body, you notice a dialogue pops up. This is what you see when you talk to NPCs inside your faction. On the bottom right you also have the ability to open the Shop by clicking on "Barter". Currently, this is a dialogue with your Cheapboy, just click through the dialog options until it closes.
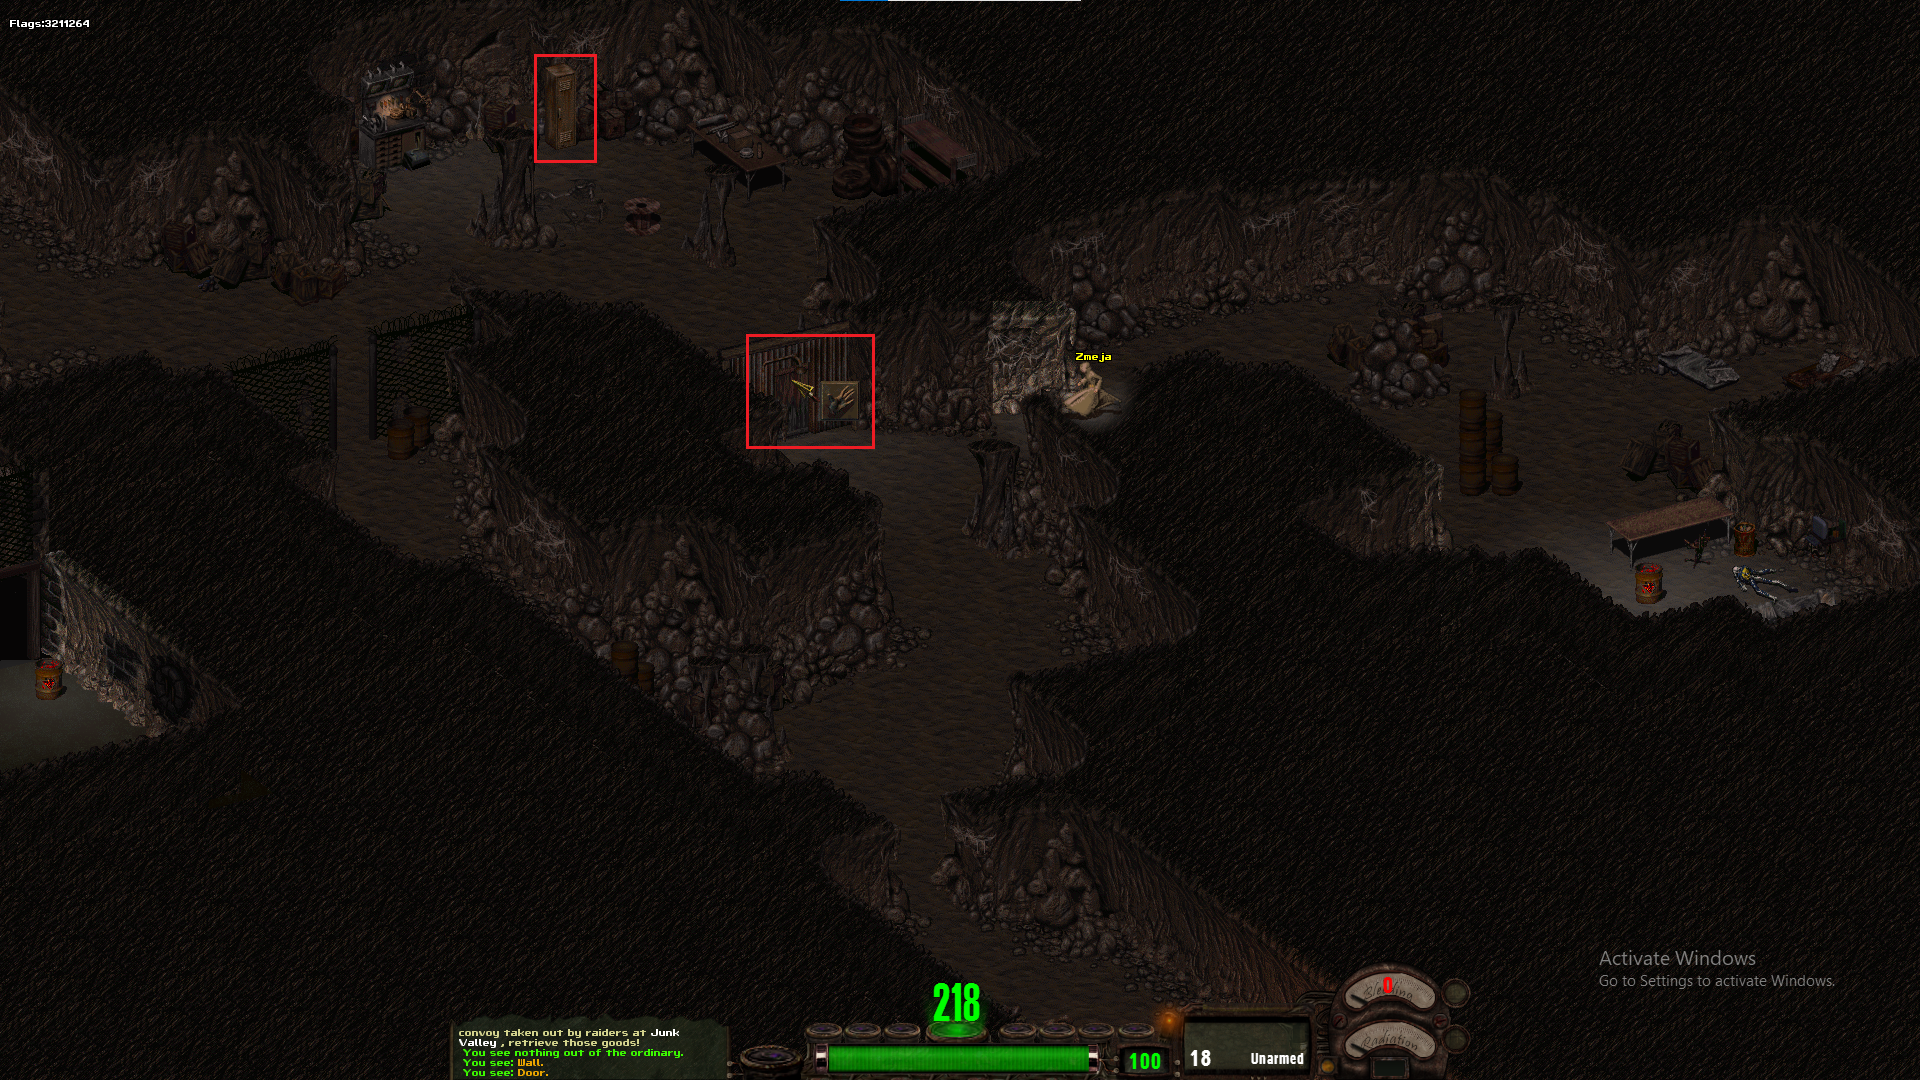
After going through the door by left-clicking it and stepping through. (You can optionally press "2" and then click on the door to automatically take a step forward, useful in PvP) Loot the container marked in the picture for a Blueprint and one part of its recipe. The other part is in the bottom left of the cave.
TODO: Choosing a Faction
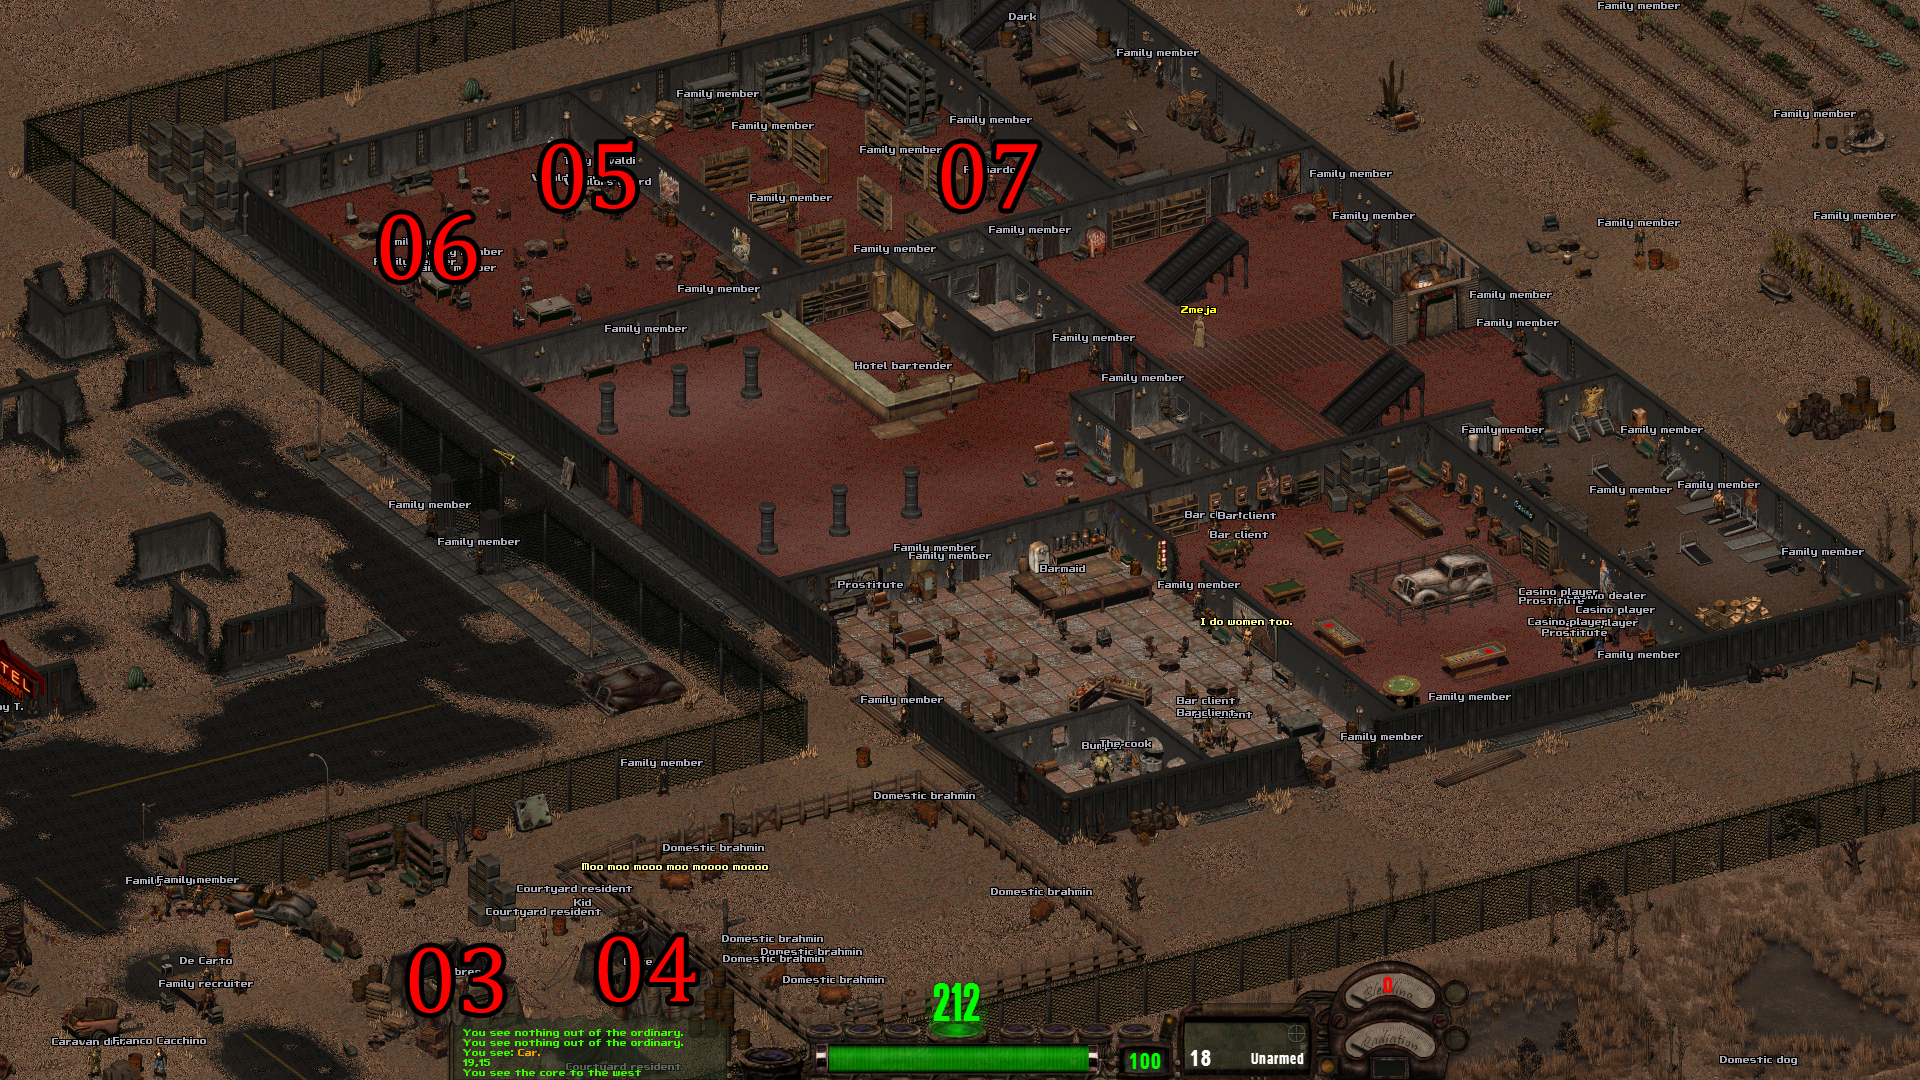
Faction Layouts
2) Questgiver
3) Brahmin Seller
4) Collector (Something Porn related)
5) Collector (Brown Briefcase)
6) Collector (Mirrored Shades)
7) Collector (Pelts) / Maybe Questgiver
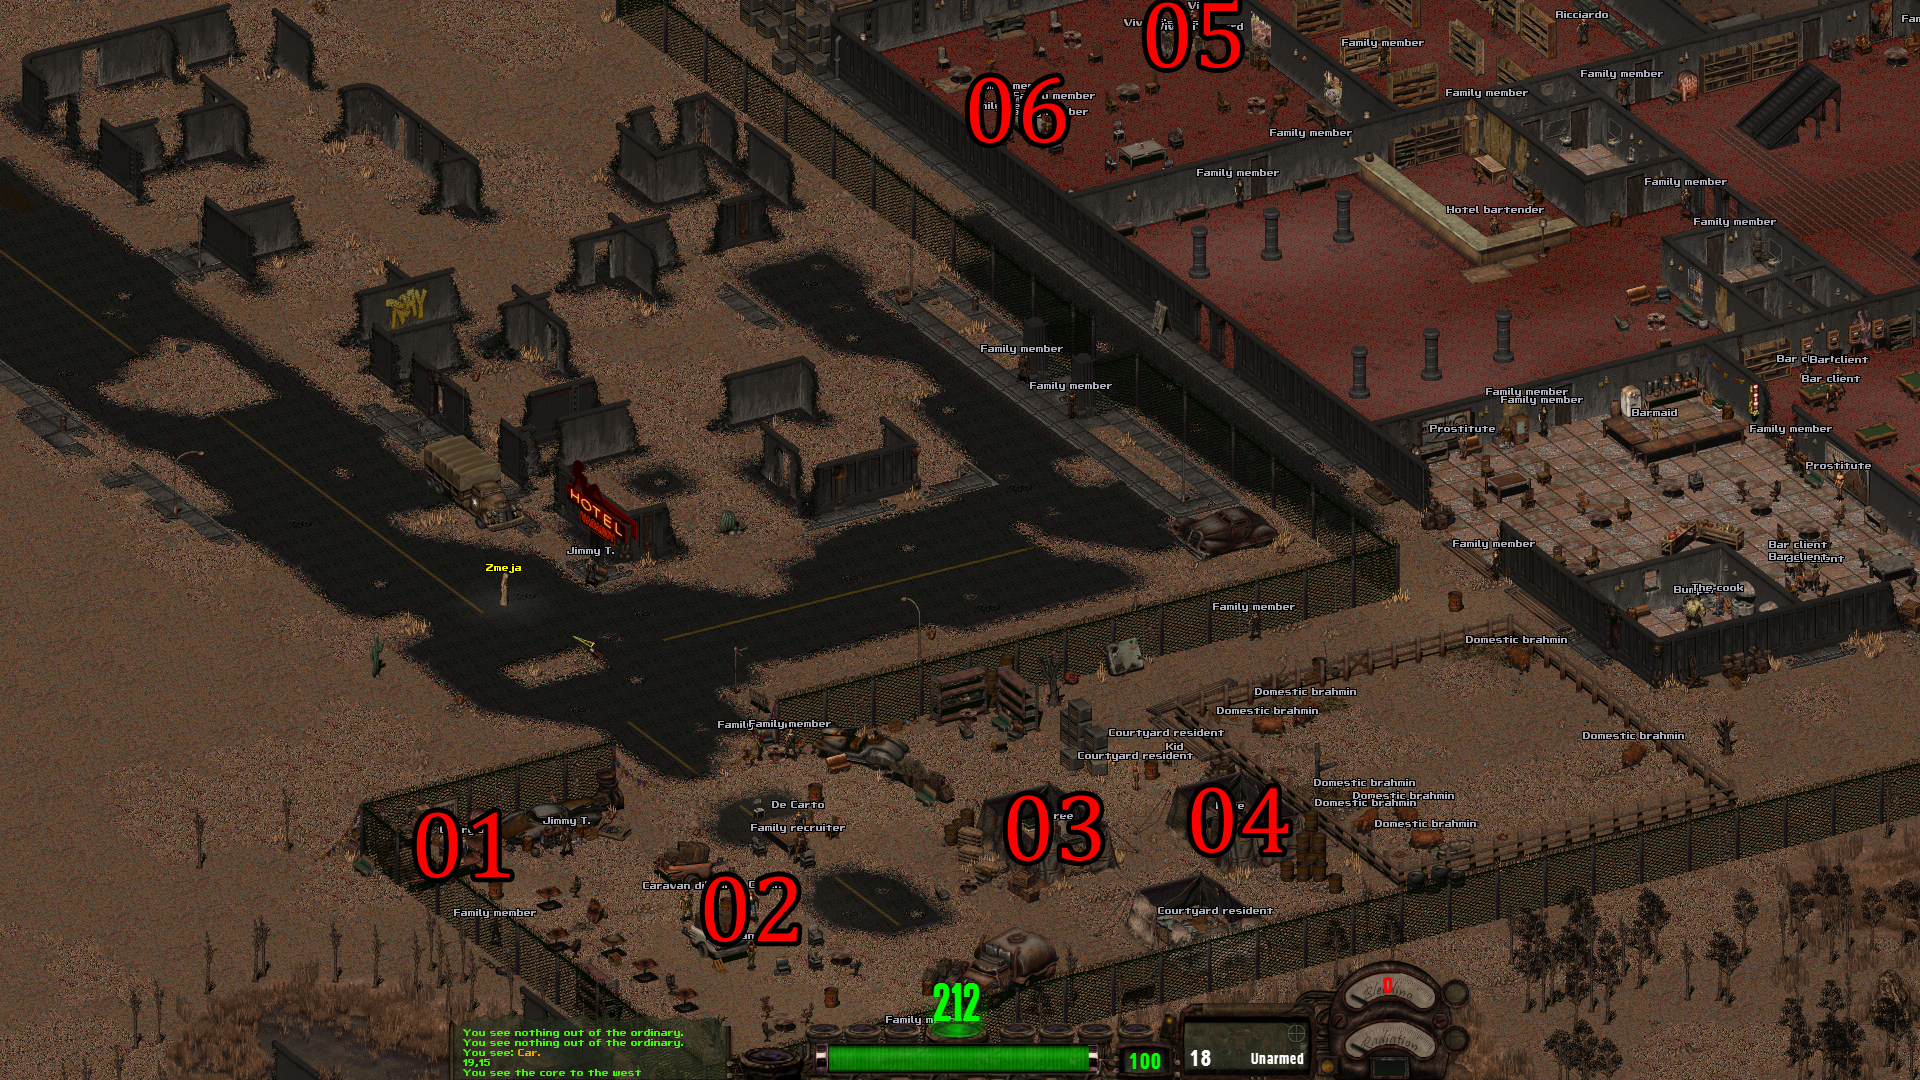
10) Payout giver
11) Armor Trader
12) Weapon Trader
13) Ammo Trader
14) Drug Trader
15) Med Trader
16) Resource Delivery
17) Crafting Materials Trader
18) Collector (Special Tec)
19) Base Manager
20) Container Trader
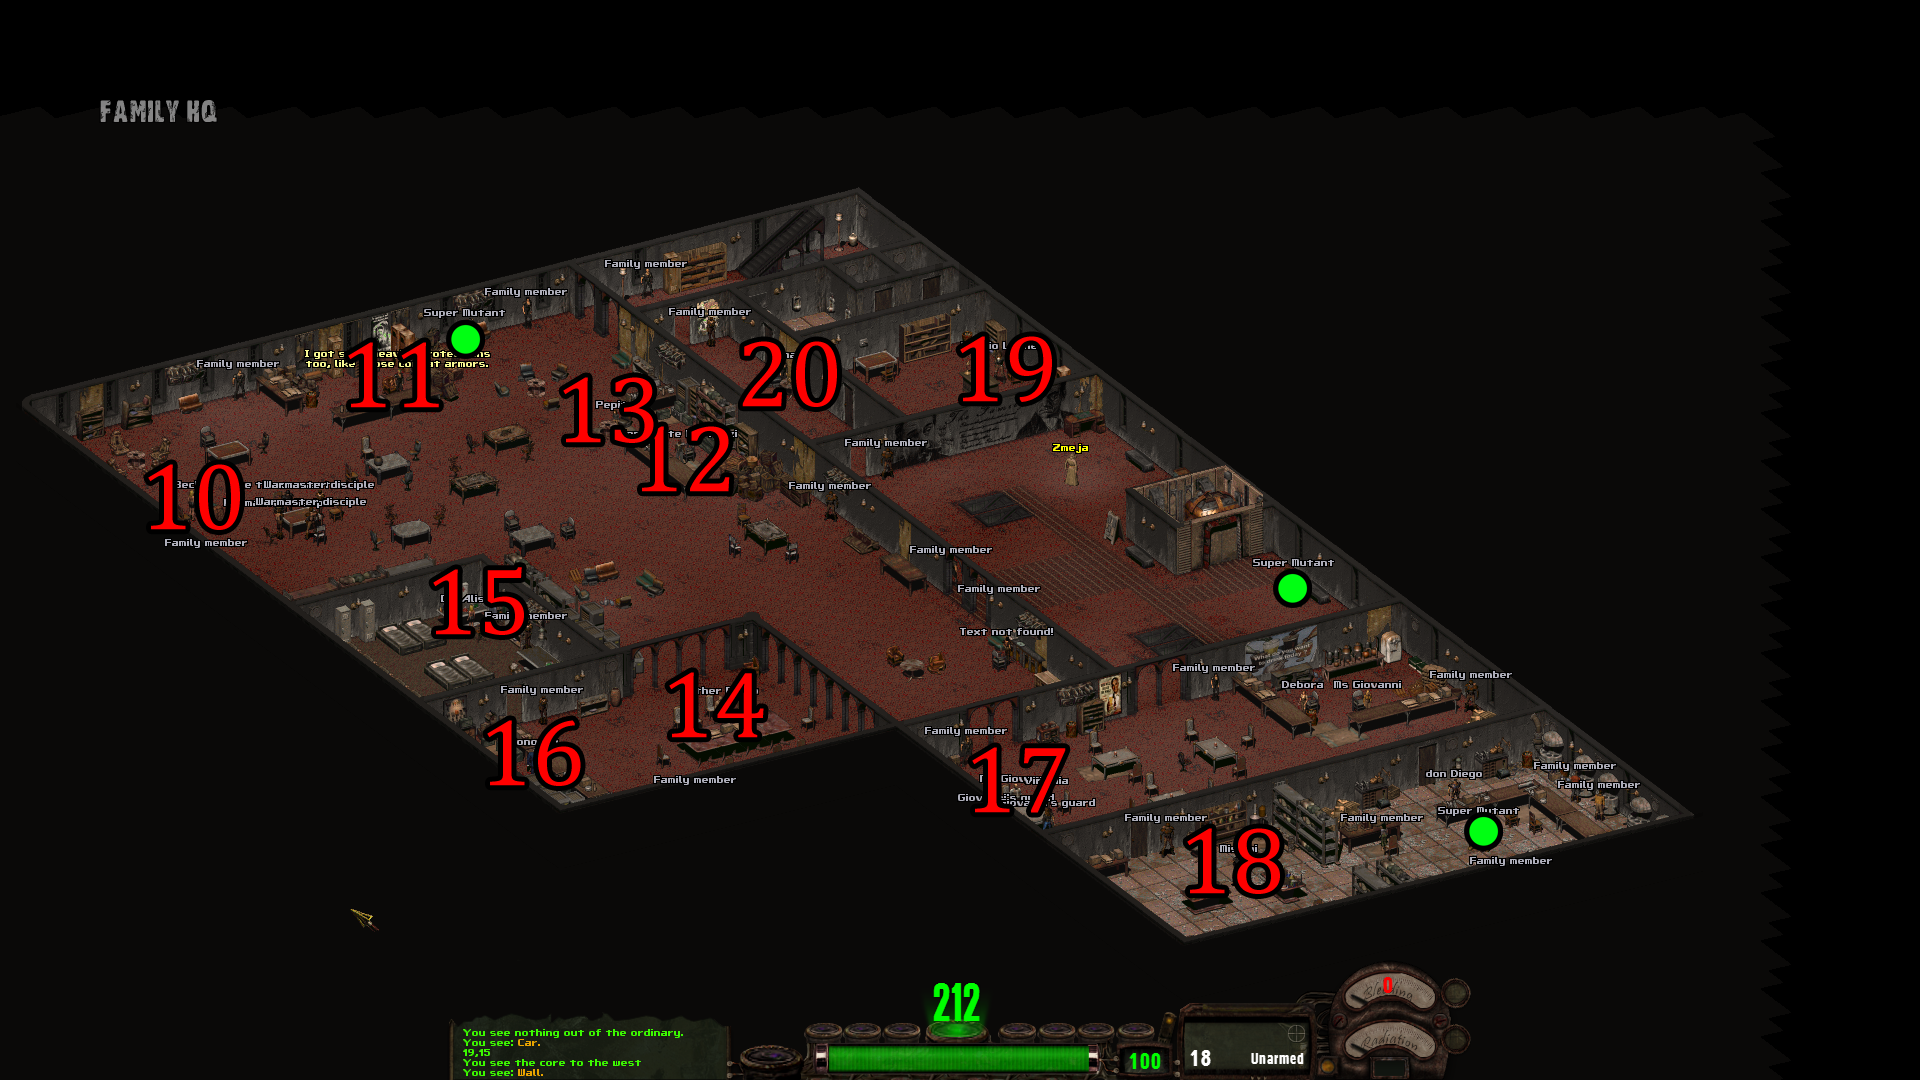
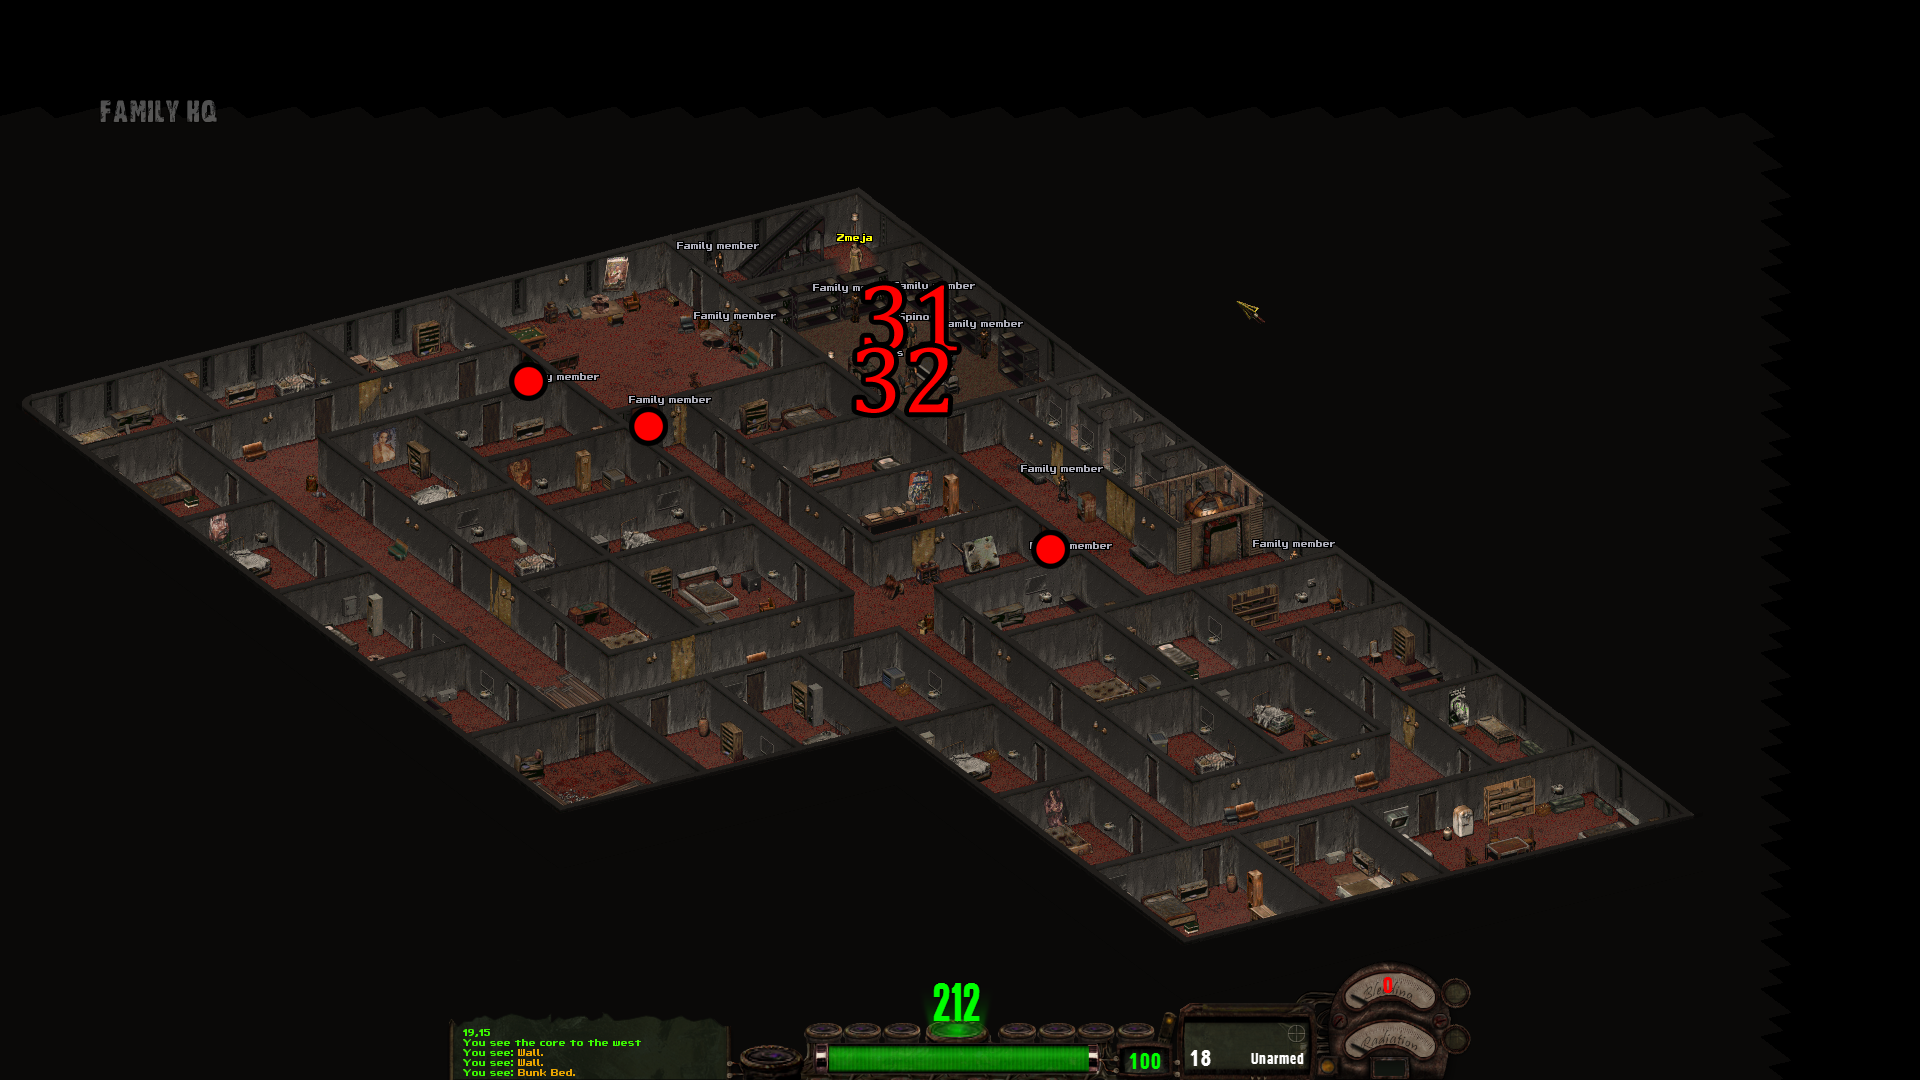
31) Questgiver
Leveling Up your Character
Leveling Up your Character can be done in many ways, some better then others.
- Explore Zones in the Core. Each Zone will give you 1k XP, and with 7x7 (49) Zones, this is a total of 49k XP. Technically increasing a Level 1 Character to Level 9 1/2. You definitely want to have as much of the Zones explored to start remembering their names and locations but also see Intel Information and good routes to take, as well as faction-ownerships.
- Loot the Zone. Every time a Container is "looked into" for the first time after a Respawn, you get XP for the Sum of the value of those items. Spreading out if you have multiple people helps, since looking into a container someone else looked into will not provide XP. Feel free to take the items as well, since you will need them.
- Read Books you looted. Every Book gives 250 XP, and your character reads up to 10 Books of a single type, saving time. Try to keep 3-5 Books in your Room or Base in case of a reroll. Since a Reroll will bring you to Level 24, but not to your actual level of Rerolling without getting at least 1 XP.
- PvE. Each time you damage NPCs, you get a portion of their XP. So don't worry about having to make the last hit. Do note however, that NPCs on this Server can be very tough to beat, as they are much more "intelligent". Clearing Dungeons is also a good way of XP and Materials, but is even harder.
- Crafting / Decrafting. Usually you want to assign 1 person to do this task, as he can focus on leveling up the Engineering (Crafting) and Science (Decrafting) Skills by doing so, allowing you to craft better items and decraft with more resources. However, it is mostly a side-way of earning XP.
- PvP. Probably the best way to earn XP and Money. However, good gear and a somewhat acceptable Level should be the base-line for that.
Try to do several methods at once, and you will be Level 24 in no time! Level 24 is what is needed for 95+% of builds to be fully effective, with very few exceptions like specialized Leadership or Sneaker Builds.
Getting Basic Gear
Getting Gear can be done in a few ways.
- Buying Gear in Base from Traders with Faction Money
- Looting Gear in Core
- Looting Gear and Materials in Core, decrafting Gear and crafting needed Gear
- Looting Gear from other Players
The most straightforward thing will be to loot Gear in core. It is quite rare to find a weapon in a container, even rarer to find Armor. However during your Level Up journey you will find a few sets to bring home and use, at least in the beginning.
Do try to upgrade as soon as possible however, as the stuff you loot is most likely badly damaged with increasing amount of debuffs on them. Repairing won't help a lot either, as the quality will still be bad.
Looting Materials and decrafting Gear will usually be the next step. Instead of bringing home the gear and decrafting at the faction workbench, you can decraft in the core. Since decrafting will usually result in materialy weighting less then the piece of gear you decrafted. You can usually bring home much more materials that way. So try to stay close to Core workbenches to decraft while looting.
Just remember, that Crafting in a faction Base costs double the resources, so effectively you also want to craft in the Core, which of course poses a bigger risk.
Looting Gear from other Players can be done after a successful PvP Encounter, and assuming those players did craft their own gear, you can get some decent stuff from them. Just remember to repair it if it is low on its Condition!
Buying Gear in your Faction Base can be done after both successful and unsuccessful PvP fights. Since they will reward you with Money you can get as a payout from your faction base. Just remember that the gear you buy there is somewhere in-between the randomly looted ones and the crafted ones, having at least a small amount of Quality Mods that will make the Armor worse then a crafted one.
You could also buy Crafting Materials with the money you earn, thus crafting your gear.
Starting out with PvE
PvE can be very hard at first. And will be even more unforgiving when Soloing. NPCs wander around in groups. Dungeons are literally filled with them. And unlike on other Servers, the AI here is quite advanced. Retreating on low HP and even healing their Teammates.
To start out, try not to venture out too far into the center of the core, as more and more dangerous enemies appear there, and you have less and less NPC guards of your faction, which will come to your aid should you get attacked by aggressive or neutral NPCs.
A good early tactic is to lure NPCs to your guards, letting them attack you, so the guards finish them off and you can loot them for some basic gear. After a while, you might want to start taking groups of NPCs with some friends. Try to take AoE Damage weapons like MGs and Fire Grenades. Using tight spaces and distance to your advantage, you can often times take out NPCs without them being able to retaliate.
In a dungeon, things get much more hectic. The very tight space and closeness to the NPCs, as well as them using weapons of previously fallen players in the dungeon (Not Armor anymore, thankfully), will make the dungeon harder with every consecutive fail. Try to use a lot of fire-grenades before the NPCs come swarming your position, as well as have at least 1 MG who can suppress them.
Starting out with PvP
If you want to start PvPing, which you should do as soon as possible due to many great rewards you can get through it, try to find the main Squad of your faction, so you can join them and see their position at all times. Whether on the current Zone, or, if you lost track of them, through the Pipboy in the Squad Menu. This allows you to always know where fights are happening, chat with them through the Squad-Chat (Write ".q YOURMESSAGEHERE" in the chat to talk to your Squadmembers). To find the main Squad, it is advised to ask around in the faction chat (Which is ".f YOURMESSAGEHERE").
Preferably, you will want to join their Discord or Teamspeak, to be able to hear communications in real-time. Most won't try to force you to use a microphone, as just hearing the Leader can already be a huge benefit, and less flood is better anyway in a combat scenario.
Try a variety of different classes, (The Main 2 to definitely try out being Sniper and Burster. With Heavy and Medic being slightly more advanced, but still beginner-friendly classes overall), and try to stay away from more complicated classes at first. (A Nader requires quite a lot of resources, while a Melee Class needs excellent positioning to not die outright.)