How to install mods: Difference between revisions
Created page with "{{Guide}} == Pretext == You can install mods. They mostly add visual changes to the game - mostly used to add Quality of Life at the cost of the overall aesthetics / prettiness of the game. Installing mods is NOT against the Server rules and can be done freely, as all they do is replace game-files (usually images). This includes either particle effects like smokes, or the HUD of the game to make it more pretty. == Method 1 == The first method of installing mods is to j..." |
Added complete guide and pictures to Mods Installation |
||
| (2 intermediate revisions by the same user not shown) | |||
| Line 4: | Line 4: | ||
You can install mods. They mostly add visual changes to the game - mostly used to add Quality of Life at the cost of the overall aesthetics / prettiness of the game. | You can install mods. They mostly add visual changes to the game - mostly used to add Quality of Life at the cost of the overall aesthetics / prettiness of the game. | ||
Installing mods is NOT against the Server rules and can be done freely, as all they do is replace game-files (usually images). This includes either particle effects like smokes, or the HUD of the game to make it more pretty. | Installing mods is NOT against the Server rules and can be done freely, as all they do is replace game-files (usually images). This includes either particle effects like smokes, or the HUD of the game to make it more pretty. | ||
A repository of common mods can be found here: [https://uralez.de/foaop/mods.php Mods]. Some additional ones may be found on the Discord, the Forums, or even be done by yourselves! Alas, there will be no guide on how to make mods yourselves, simply asking around on Discord should give you plenty of guidance to start working on them! (You can also just unpack the mods that already exist to see how they work.) | |||
== Method 1 == | == Method 1 == | ||
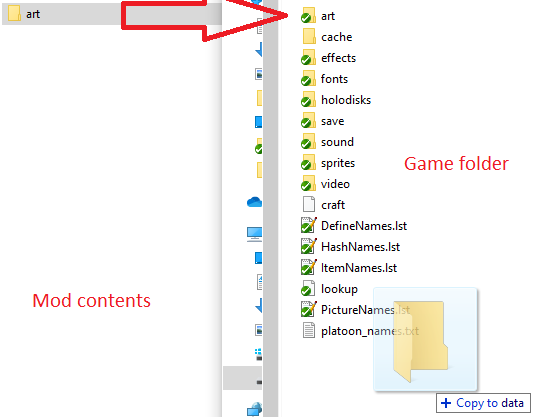
The first method of installing mods is to just unpack them and mirror the directories of the mod to the games directories. While this is a little bit easier, this is '''not advised, as this will overwrite the default files of the game''', making reverting the changes back to the base a lot more difficult - and in case of an update to the files due to a server's patch changing those exact files, overwrite the mod in question! | The first method of installing mods is to just unpack them and mirror the directories of the mod to the games directories. While this is a little bit easier, this is '''not advised, as this will overwrite the default files of the game''', making reverting the changes back to the base a lot more difficult - and in case of an update to the files due to a server's patch changing those exact files, overwrite the mod in question! | ||
[[File:ModsInstall1.png|frame|none|Method 1 of installing mods by overwriting game files]] | |||
== Method 2 == | == Method 2 == | ||
Method 2 is preferred, as disabling and enabling mods is very easily done with a config file - and updates to the server will not break the mods. It needs a little bit more set-up, but this is what the guide is for! In addition - if a mod should sit atop of another mod, because one mod changes a lot, another a little but they change mostly the same files, the config will allow you to designate a so-called "load-order". | Method 2 is preferred, as disabling and enabling mods is very easily done with a config file - and updates to the server will not break the mods. It needs a little bit more set-up, but this is what the guide is for! In addition - if a mod should sit atop of another mod, because one mod changes a lot, another a little but they change mostly the same files, the config will allow you to designate a so-called "load-order". | ||
=== Step 1 === | |||
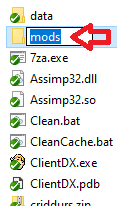
Create a folder in your game files (inside the root folder which also has the game executable). Call it any way you want but the name "mods" might be preferred. | |||
[[File:ModsInstall2 1.png|frame|none|Creating a 'mods' folder in the game's directory]] | |||
=== Step 2 === | |||
Move your mods into the newly created folder, still packed in a zip. Do not unpack the mod! | |||
[[File:ModsInstall2 2.png|frame|none|Moving the mods into the 'mods' folder we created.]] | |||
=== Step 3 === | |||
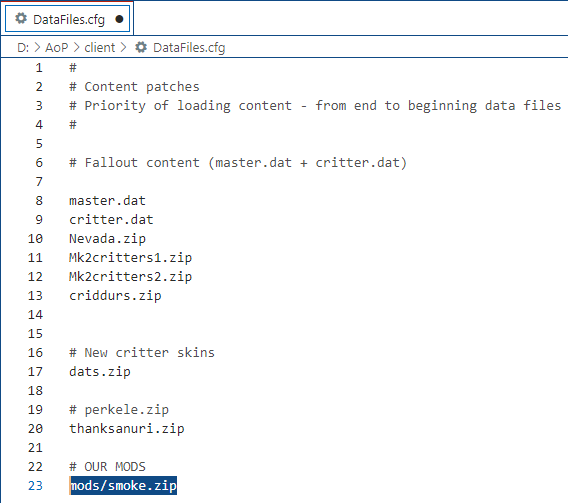
Inside the game's directory you will find a file called 'DataFiles.cfg', this is the file we need to open and add our mod's path to it. You can add multiple mods to the list. The order is important, as the load-order dictates what mods overwrite other mods, in case they change the same game-file. | |||
The big advantage here is, that for one, updates will not overwrite out mods files - as well as being able to disable mods simply by commenting them out with a '#'. | |||
Note: ''Some mods are '''not''' able to be installed with method 2, in which case you will be forced to use method 1! Though this is generally an exception.'' | |||
[[File:ModsInstall2 3.png|frame|none|Adding the path to our mod into the 'DataFiles.cfg']] | |||
[[Category:Guides]] | [[Category:Guides]] | ||
Latest revision as of 15:18, 10 March 2024
Guides are almost always a work of personal opinions and thus results may differ.
Pretext
You can install mods. They mostly add visual changes to the game - mostly used to add Quality of Life at the cost of the overall aesthetics / prettiness of the game. Installing mods is NOT against the Server rules and can be done freely, as all they do is replace game-files (usually images). This includes either particle effects like smokes, or the HUD of the game to make it more pretty.
A repository of common mods can be found here: Mods. Some additional ones may be found on the Discord, the Forums, or even be done by yourselves! Alas, there will be no guide on how to make mods yourselves, simply asking around on Discord should give you plenty of guidance to start working on them! (You can also just unpack the mods that already exist to see how they work.)
Method 1
The first method of installing mods is to just unpack them and mirror the directories of the mod to the games directories. While this is a little bit easier, this is not advised, as this will overwrite the default files of the game, making reverting the changes back to the base a lot more difficult - and in case of an update to the files due to a server's patch changing those exact files, overwrite the mod in question!

Method 2
Method 2 is preferred, as disabling and enabling mods is very easily done with a config file - and updates to the server will not break the mods. It needs a little bit more set-up, but this is what the guide is for! In addition - if a mod should sit atop of another mod, because one mod changes a lot, another a little but they change mostly the same files, the config will allow you to designate a so-called "load-order".
Step 1
Create a folder in your game files (inside the root folder which also has the game executable). Call it any way you want but the name "mods" might be preferred.

Step 2
Move your mods into the newly created folder, still packed in a zip. Do not unpack the mod!

Step 3
Inside the game's directory you will find a file called 'DataFiles.cfg', this is the file we need to open and add our mod's path to it. You can add multiple mods to the list. The order is important, as the load-order dictates what mods overwrite other mods, in case they change the same game-file.
The big advantage here is, that for one, updates will not overwrite out mods files - as well as being able to disable mods simply by commenting them out with a '#'.
Note: Some mods are not able to be installed with method 2, in which case you will be forced to use method 1! Though this is generally an exception.

