Tutorial Caves: Difference between revisions
No edit summary |
m (Keybinds) |
||
| (7 intermediate revisions by the same user not shown) | |||
| Line 3: | Line 3: | ||
== Moving the Camera around == | == Moving the Camera around == | ||
You can move the camera around by either Edge-Panning, or using your Arrow-Keys on your keyboard. You can also click the | You can move the camera around by either Edge-Panning, or using your Arrow-Keys on your keyboard. You can also click the {{key press|Home}} button on your keyboard to center the view onto your character. | ||
You can also use | You can also use {{key press|Mousewheel Scroll}} to zoom in and out of your view. | ||
== Movement == | == Movement == | ||
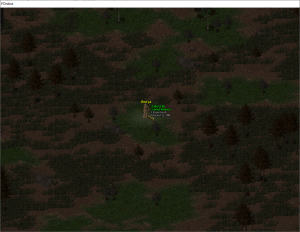
[[File:Movement.png|frameless| | [[File:TutorialCaveEntrance.png|frameless|left|Entrance to the Cave]] | ||
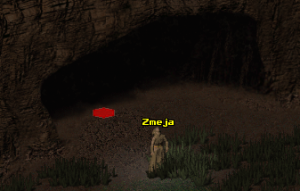
Moving around is as simple as issuing a | [[File:Movement.png|frameless|right|Movement Cursor]] | ||
Moving around is as simple as issuing a {{key press|Right Click}} on the [[Hex]] you want to walk onto. This will make your character find the shortest path to that location. If for example a path involves a door, which closes, your character will automatically find the next best path. By default, your character is running, though by holding {{key press|Shift}}, you can force them to walk. | |||
Now, move your camera to the north and enter the cave. Simply move into the cave-entrance, and your character will automatically progress to the next area of the map. | Now, move your camera to the north and enter the cave. Simply move into the cave-entrance, and your character will automatically progress to the next area of the map. | ||
<br><br><br> | |||
Once inside, your first task await. First things first, we want to unlock our whole HUD. For this, we need to take the Pipboy from a skeleton in the eastern side of the cave. So. Walk up to it and click on him with your mousecursor! If you have by accident enabled the Attack Mode, you can switch between Usage Mode and Attack Mode by pressing | == Caves == | ||
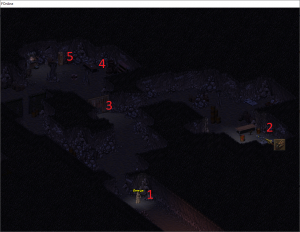
[[File:Tutorial2.png|thumb|Part 1 of Tutorial Cave]] | |||
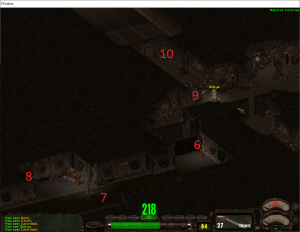
[[File:Tutorial4.png|thumb|Part 2 of Tutorial Cave]] | |||
Once inside, your first task await. First things first, we want to unlock our whole HUD. For this, we need to take the Pipboy from a skeleton (2) in the eastern side of the cave. So. Walk up to it and click on him with your mousecursor! If you have by accident enabled the Attack Mode, you can switch between Usage Mode and Attack Mode by pressing {{key press|Space}}. | |||
Once you have your HUD unlocked, and also looted the key from the skeleton for the next door (3), walk up to it and open it with yet another click. In Container (4), you will find a Melee Weapon, as well as a Molotov. You should now a accustom yourself to your inventory. Open it up with {{key press|I}}, and drag the Weapon into your main hand, and the molotov into the Utility slot. You can use items from the Utility Slot by pressing {{key press|E}}, this would allow you to throw the Molotov onto a position of your choosing, given, it is in range. Your character can also miss! So unless you are standing close to a window, it would be difficult, without sufficient skill, to throw a grenade through one, for example. | |||
Once done, loot Container (5) for the Explosives Recipe, as well as the first part of resources, needed to craft it. You will need to craft one at the end, in order to escape the caves. | |||
Go down the ladder (6). It is now, that you will find yourself damaged, as well as with a broken leg. Before venturing further, and meeting your first enemy, you should first tend to your wounds! [[First Aid]], will heal you up a bit. Press {{key press|Alt|F1}} to heal yourself, though you can also press {{key press|5}} and click on yourself. [[Doctor]] will take care of your broken leg. Press {{key press|Alt|F2}} to fix your leg, though you can also press {{key press|6}} and click on yourself. | |||
Once you have back all the Action Points you used for treating yourself, you will meet your first enemy. A plant (7)! Even though it looks harmless, when introduced to the tutorial area the first time, even veterans were caught off-guard and almost died!<br> | |||
You can either go the easy way and just throw a molotov on it, waiting until it burns to a crisp. Or, if you feel yourself handy enough, start stabbing it with your machete! Just make sure to retreat if your HP go to low and heal yourself back up. But, unless you are very unlucky, you should be able to kill it without retreating. Once dead, feel free to scavenge it for plant fiber. If you're lucky, you might level up your [[Outdoorsman]] skill! | |||
Once killed, go and loot the table (8), before going back up the ladder (6) to go towards the rocks at the northern part of it. A pickaxe (9) will be lying on the ground. If you fancy yourself some mining, equip it into your off-hand. You can now switch in-between your main and off-hand item by pressing {{key press|B}}. With pickaxe at hand, start mining those little rocks (9) in-between the two massive stones! With a few of those at hand, you can later on process them to precious materials! | |||
In order to finally leave the tutorial area, you have one more task ahead of you. To blow up the door. In order to do that, use the Blueprint you have looted earlier. Open your inventory, make sure you are in Cursor-Mode, and long-click the sheet of paper. Once a menu pops up, keep holding your mouse-button and drag it down towards the Use-Icon - now, you can let go of your left mouse button. With the crafting interface open, you should have enough resources looted around, in order to craft the Dynamite. | |||
Once you have crafted the dynamite, put it in your hands, and use it on the door (10). (Attack the door with the dynamite in your hands). It should automatically apply to the door and explore seconds later, allowing you to finally breathe fresh air and leave the godforsaken cave! | |||
Only appear in an even worse smelling area, called the [[Sewer]], right inside the [[Rats]] Headquarters. | |||
Congratulation! Tutorial finished! Now it's time to choose a faction, or, first explore the world. You can always choose a faction later! And by then you might have made a friend who is already in a faction. Or some enemies you'd rather not join. Heh. | |||
Latest revision as of 11:02, 3 April 2024

Loading into your character after creation, will spawn you into the wasteland, with a cave-entrance further north. You will be wearing Sand Robes, and have only limited access to the HUD. If you aim your mouse cursor over your character, you can see some basic stats. Your Current HP / Maximum HP, your armor (Sand Robes), equipped weapon (Unarmed), and any Bounty you might have on your head (14).
Moving the Camera around
You can move the camera around by either Edge-Panning, or using your Arrow-Keys on your keyboard. You can also click the Home button on your keyboard to center the view onto your character. You can also use Mousewheel Scroll to zoom in and out of your view.
Movement


Moving around is as simple as issuing a Right Click on the Hex you want to walk onto. This will make your character find the shortest path to that location. If for example a path involves a door, which closes, your character will automatically find the next best path. By default, your character is running, though by holding ⇧ Shift, you can force them to walk.
Now, move your camera to the north and enter the cave. Simply move into the cave-entrance, and your character will automatically progress to the next area of the map.
Caves


Once inside, your first task await. First things first, we want to unlock our whole HUD. For this, we need to take the Pipboy from a skeleton (2) in the eastern side of the cave. So. Walk up to it and click on him with your mousecursor! If you have by accident enabled the Attack Mode, you can switch between Usage Mode and Attack Mode by pressing Space. Once you have your HUD unlocked, and also looted the key from the skeleton for the next door (3), walk up to it and open it with yet another click. In Container (4), you will find a Melee Weapon, as well as a Molotov. You should now a accustom yourself to your inventory. Open it up with I, and drag the Weapon into your main hand, and the molotov into the Utility slot. You can use items from the Utility Slot by pressing E, this would allow you to throw the Molotov onto a position of your choosing, given, it is in range. Your character can also miss! So unless you are standing close to a window, it would be difficult, without sufficient skill, to throw a grenade through one, for example. Once done, loot Container (5) for the Explosives Recipe, as well as the first part of resources, needed to craft it. You will need to craft one at the end, in order to escape the caves.
Go down the ladder (6). It is now, that you will find yourself damaged, as well as with a broken leg. Before venturing further, and meeting your first enemy, you should first tend to your wounds! First Aid, will heal you up a bit. Press Alt+F1 to heal yourself, though you can also press 5 and click on yourself. Doctor will take care of your broken leg. Press Alt+F2 to fix your leg, though you can also press 6 and click on yourself.
Once you have back all the Action Points you used for treating yourself, you will meet your first enemy. A plant (7)! Even though it looks harmless, when introduced to the tutorial area the first time, even veterans were caught off-guard and almost died!
You can either go the easy way and just throw a molotov on it, waiting until it burns to a crisp. Or, if you feel yourself handy enough, start stabbing it with your machete! Just make sure to retreat if your HP go to low and heal yourself back up. But, unless you are very unlucky, you should be able to kill it without retreating. Once dead, feel free to scavenge it for plant fiber. If you're lucky, you might level up your Outdoorsman skill!
Once killed, go and loot the table (8), before going back up the ladder (6) to go towards the rocks at the northern part of it. A pickaxe (9) will be lying on the ground. If you fancy yourself some mining, equip it into your off-hand. You can now switch in-between your main and off-hand item by pressing B. With pickaxe at hand, start mining those little rocks (9) in-between the two massive stones! With a few of those at hand, you can later on process them to precious materials!
In order to finally leave the tutorial area, you have one more task ahead of you. To blow up the door. In order to do that, use the Blueprint you have looted earlier. Open your inventory, make sure you are in Cursor-Mode, and long-click the sheet of paper. Once a menu pops up, keep holding your mouse-button and drag it down towards the Use-Icon - now, you can let go of your left mouse button. With the crafting interface open, you should have enough resources looted around, in order to craft the Dynamite.
Once you have crafted the dynamite, put it in your hands, and use it on the door (10). (Attack the door with the dynamite in your hands). It should automatically apply to the door and explore seconds later, allowing you to finally breathe fresh air and leave the godforsaken cave!
Only appear in an even worse smelling area, called the Sewer, right inside the Rats Headquarters.
Congratulation! Tutorial finished! Now it's time to choose a faction, or, first explore the world. You can always choose a faction later! And by then you might have made a friend who is already in a faction. Or some enemies you'd rather not join. Heh.
